Everything you need to know about the pitfalls of taking your Motorcycle Test Module 1
The right paperwork!
Too many people go to their test without the right paperwork and lose their test fee before they have even started.
You will need:
- A current in date correctly filled out Compulsory Basic Training (CBT) certificate.
- Your UK driving licence (full or provisional) – make sure it is current (photos only last 10 years) and that you have completed any section for address changes if necessary.
- If you have an old paper licence you must have photo ID (passport).
- Your current in date Motorcycle (category A) Theory Test pass certificate.
- Glasses or contact lenses (if required) to read a number plate from a distance of 20.5 metres
- A motorcycle/scooter that is road legal (taxed, insured and with a current MoT if over 3 years old) displaying full sized L-plates front and rear, fitted with mirrors and that is suitable for the test you wish to take.
- You must turn up at the right time – if you’re late it’s too bad.
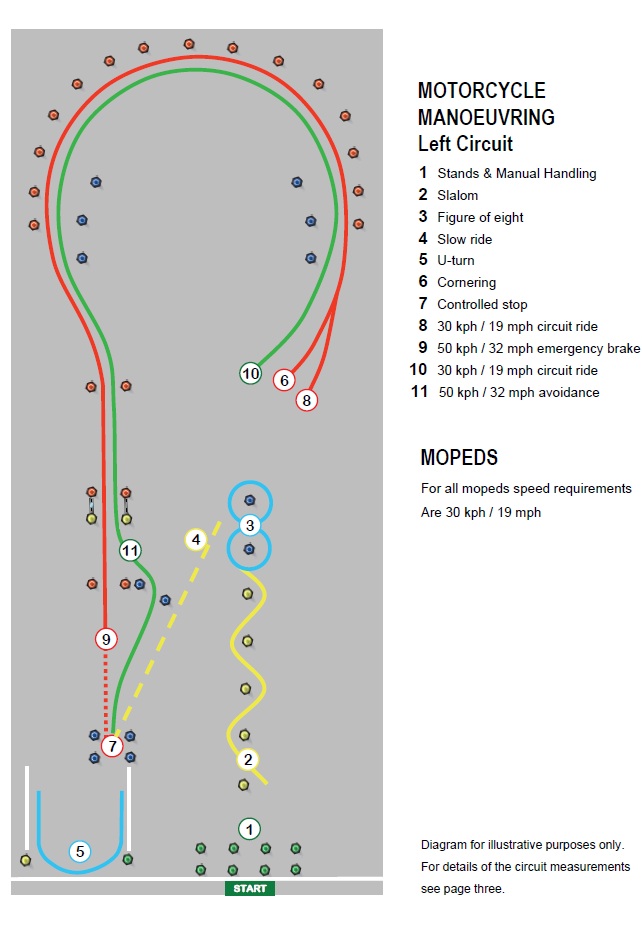
Motorcycle Test – Module 1
The two key things the examiner tells you at the start off the test are to 1) treat the test pad “as if you are on a public road, including carrying out all necessary precautions/observations”, 2) not to come into contact with any cones (during a manoeuvre or moving between manouevres). You can incur up to five minor faults, but generally you won’t be allowed to get more than three missed observations. The minimum speed requirement for the emergency stop and swerve is 50 kph, but a pass can be acheived with speeds of 48 or 49kph although this will result in a minor fault. Ideally they should be carried out as close to 50kph as possible. Going too fast is not a fault but can make things considerably trickier.